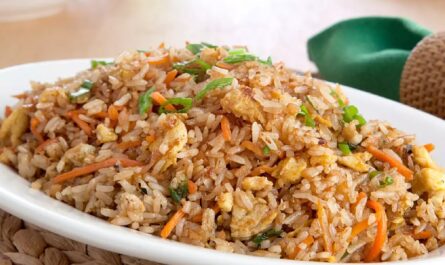
If you’re on the lookout for a delectable yet simple dish to cook, you simply cannot go wrong with this taiwanese fried rice recipe, which embodies the very essence of comfort food and culinary craftsmanship. Fried rice isnt merely a way to use leftover rice; its an art form, especially when you delve into the unique textures and flavors that Taiwan has to offer. Whether you’re preparing it for a family dinner or as a delightful main dish for a gathering, this dish promises to resonate with food lovers of all stripes.

What Makes Taiwanese Fried Rice Unique?
The beauty of Taiwanese fried rice lies in its profound depth of flavor and aromatic complexity. It’s not just about tossing some rice and vegetables in a pan; its about balancing flavors, textures, and colors to create a harmonious dish that delights the senses. From the smokiness of the wok to the subtle sweetness of charred vegetables, each ingredient plays its part, and every bite tells a story. The inclusion of marinated proteins, vibrant vegetables, and a splash of soy sauce contributes to a mouthwatering dish thats hard to resist.
Ingredients You’ll Need
- 4 cups of cooked jasmine rice (preferably chilled)
- 2 tablespoons of vegetable oil
- 3 cloves of garlic, finely minced
- 1 cup of diced carrots
- 1 cup of peas
- 1/2 cup of diced bell peppers (red and green)
- 2 eggs, beaten
- 1/2 cup of char siu (Taiwanese BBQ pork) or any protein of your choice (chicken, shrimp, etc.)
- 3 tablespoons of soy sauce
- 1 tablespoon of sesame oil
- Salt and pepper to taste
- Green onions for garnish
Essential Cookware for Perfecting Your Dish
To replicate this exquisite taiwanese fried rice recipe flawlessly, you must arm yourself with the right tools. A high-quality rice cooker will ensure your rice is cooked to perfection, eliminating the risk of undercooked or sticky grains. Alongside that, a sharp knife will help you to finely chop your vegetables, allowing them to cook quickly and evenly. Don’t forget a functional cutting board where you can comfortably prep all your ingredients before stir-frying them.
Step-by-Step Cooking Instructions
1. **Preparation of Ingredients:** Begin by gathering all your ingredients and prepping them properly. Ensure your rice is cold, ideally made the day before and stored in the fridge. This helps prevent the rice from becoming mushy during the frying process. Dice your bell peppers, dice carrots, and chop green onions finely according to preference. Mince the garlic as well, as these flavors will form the base of your stir-fry.
2. **Heat the Pan:** In a large wok or non-stick frying pan, add the vegetable oil and heat it over medium to high heat until it’s shimmering. A wok is ideal as it allows for even cooking at high temperatures and provides the best results.
3. **Cooking the Vegetables and Protein:** Begin by adding minced garlic to the hot oil. Stir it quickly to prevent burning. Then, add your diced vegetables carrots, peas, and bell peppers. Stir-fry these for about 3-5 minutes until they are tender yet maintain a little crunch. If you’re using a protein such as char siu or shrimp, add it at this point to warm and combine with the vegetables.
4. **Incorporate the Rice:** Now, add the chilled rice to the pan. Use a spatula or wooden spoon to break up any clumps of rice. Stir everything together, ensuring that the rice is evenly mixed with the cooked vegetables and proteins. Allow it to fry for several minutes. The goal is to achieve a slight crispiness on the rice, which exudes an irresistible flavor.
5. **Seasoning:** Pour the soy sauce and sesame oil over your fried rice. Make sure to pour it evenly to enhance flavor throughout the dish. Toss everything together and season with salt and pepper according to your taste preferences.
6. **Adding the Eggs:** Push the rice mixture to one side of the pan, creating a space. Pour the beaten eggs into this empty space and lead your spatula to scramble them, cooking until just set. Once cooked, mix the scrambled eggs into the fried rice, ensuring even distribution.
7. **Finishing Touches:** Finally, remove your Taiwanese fried rice from the heat. Garnish generously with chopped green onions, and if you wish, a drizzle of extra sesame oil for added flavor. Serve hot and enjoy! Each spoonful will take you on a delightful journey through the flavors of Taiwan.
Frequently Asked Questions
1. Can I use day-old rice for this recipe?
Absolutely, using day-old rice is recommended as it helps achieve the perfect texture. Freshly cooked rice is often too moist and can result in clumping when fried.
2. What types of vegetables can I include?
Feel free to mix and match vegetables according to your preference. Broccoli, corn, or baby corn are great additions, adding color and flavor to your dish!
3. Can I make this dish vegetarian?
Yes, you can easily make a vegetarian version by omitting meats and incorporating tofu or additional vegetables. You can also adjust the sauce to your taste.
Cleaning Your Cookware
After enjoying this delightful dish, its important to maintain your kitchen tools to ensure they remain in great condition. Invest in a good cookware cleaner to get the best results without damaging the surfaces. For wooden boards, utilize a cutting board conditioner to keep them well-maintained and prevent cracks or warped surfaces.
Conclusion: A Delight to Be Shared
This taiwanese fried rice recipe offers not just a meal, but an experience you can share with loved ones. Unique and flavor-packed, it encapsulates the rich culinary traditions of Taiwan. With every spoonful, with delightful variations and hearty textures, you can savor the love and creativity put into this simple yet extraordinary dish. Don’t forget to explore related recipes such as Steak and Shrimp Fried Rice, Gordon Ramsay Fried Rice, and Chicken Teriyaki Fried Rice for further culinary adventures.
As an Amazon Associate, I earn from qualifying purchases.
——————————————————————————————————–
Disclosure: This post contains affiliate links. As an Amazon Associate I earn from qualifying purchases, but there will be no extra charges to you. Thank you for your support!


