The Ultimate Easy Sushi Rice Balls Recipe
Sushi lovers, rejoice! Today, we’re taking a delicious detour from traditional sushi rolls and diving straight into the art of making easy sushi rice balls. These delightful morsels, also known as onigiri, are a beloved staple in Japanese cuisine and are perfect for a quick snack, a fun lunchbox addition, or even a charming addition to your party platter. With minimal effort and maximum flavor, this easy sushi rice balls recipe is bound to become a favorite in your culinary repertoire.

What Are Sushi Rice Balls?
Sushi rice balls, or onigiri, are a quintessential part of Japanese food culture. Unlike the more elaborate sushi rolls, onigiri are simple to make yet incredibly satisfying. These rice balls usually consist of seasoned sushi rice shaped into triangles or cylinders and often include a savory filling like pickled plum (umeboshi), salmon, or tuna. Wrapped in a crispy sheet of nori (seaweed), onigiri offers a fantastic balance of flavors and textures, making them a delightful treat for any occasion.
Benefits of Making Sushi Rice Balls at Home
There are numerous benefits to preparing these delightful rice balls at home, from cost savings to personalization of flavors. One of the most significant advantages is the complete control over ingredients, allowing you to use fresh, high-quality components to suit your taste and dietary preferences. Additionally, making sushi rice balls at home is a fun and creative activity that can be enjoyed with family members or friends, providing a sense of accomplishment and a rewarding culinary experience. Plus, onigiri are portable and easy to pack, making them an excellent option for lunchboxes, picnics, or travel snacks.
Necessary Equipment
Ingredients:
- 2 cups of sushi rice
- 2 1/2 cups of water
- 2 tablespoons of rice vinegar
- 1 tablespoon of sugar
- 1 teaspoon of salt
- Your choice of fillings (tuna, salmon, pickled plum, etc.)
- Nori sheets
Equipment:
Step-by-Step Guide to Making Sushi Rice Balls
Making sushi rice balls at home is a straightforward process and can be broken down into easy-to-follow steps. Here’s how you can create these delightful treats:
Step 1: Prepare the Sushi Rice
Start by thoroughly rinsing the sushi rice under cold water using a strainer. Repeat the process until the water runs clear, ensuring that any excess starch is removed. Place the rinsed rice in your rice cooker and add 2 1/2 cups of water. Allow the rice to soak for at least 30 minutes before cooking. Once soaked, cook the rice following your rice cooker’s instructions. While the rice is cooking, prepare the sushi vinegar by combining rice vinegar, sugar, and salt in a small bowl. Stir well until the sugar and salt are fully dissolved.
Step 2: Season the Rice
Once the rice is cooked, transfer it to a large, shallow bowl (a wooden or glass bowl works best). While the rice is still hot, evenly sprinkle the sushi vinegar mixture over it. Use a gentle slicing motion with a wooden spatula (shamoji) to mix the rice and vinegar, being careful not to mash the grains. Allow the rice to cool to room temperature, as this will make it easier to shape the rice balls.
Step 3: Shape the Rice Balls
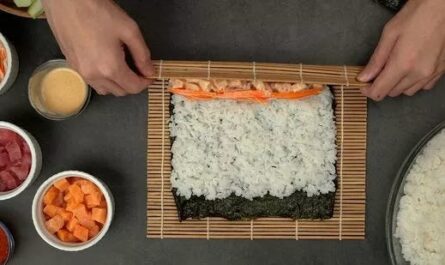
With clean, slightly damp hands, take a handful of the seasoned rice and shape it into a ball, cylinder, or triangle, depending on your preference. If you’re adding a filling, create a small indentation in the center of the rice ball with your thumb, place a bit of your chosen filling into the center, then gently press more rice over the filling to secure it. Repeat this process until all the rice is used up.
Step 4: Wrap with Nori
Cut the nori sheets into strips or pieces that will fit around the rice balls. Wrap each rice ball with a piece of nori, pressing gently to make sure it adheres. The slight moisture from the rice will help the nori stick. For added flavor, you can lightly toast the nori sheets before wrapping.
Serving Suggestions and Variations
Onigiri can be enjoyed as is, but there are plenty of ways to get creative and enhance their flavor and presentation. Here are some serving suggestions and variations to consider:
Garnishes and Toppings
Sprinkle your onigiri with sesame seeds, furikake (a Japanese seasoning mix), or finely chopped herbs like chives or shiso leaves for added flavor and visual appeal. Small dabs of wasabi or a brush of soy sauce can also add an extra kick.
Alternative Fillings
While traditional fillings like pickled plum, salmon, and tuna are always a delight, don’t hesitate to experiment with other options. Consider using leftover teriyaki chicken, spicy crab mix, or even a vegetarian filling like avocado or grilled vegetables. The possibilities are endless, and you can tailor each batch to suit your taste preferences.
Shapes and Sizes
Feel free to experiment with different shapes and sizes when making your sushi rice balls. Smaller, bite-sized onigiri are perfect for appetizers or party platters, while larger, heartier rice balls can serve as a more substantial meal. Get creative with molds and cutters to make cute and fun shapes that kids will love.
Storing and Enjoying Your Sushi Rice Balls
Onigiri are best enjoyed fresh, but they can also be stored for later enjoyment. If you plan to eat them within a few hours, wrap each rice ball tightly in plastic wrap to keep them moist and prevent the nori from becoming soggy. For longer storage, place the wrapped onigiri in an airtight container and refrigerate for up to 24 hours. To restore their original texture, consider reheating them briefly in the microwave before eating. While traditional onigiri are meant to be enjoyed at room temperature, a light warming can bring back their softness and flavor.
Health Benefits of Sushi Rice Balls
Onigiri offer a range of health benefits due to their wholesome ingredients. Sushi rice provides a good source of carbohydrates for energy, while the fillings often contain valuable nutrients like protein, omega-3 fatty acids, vitamins, and minerals. Seaweed, which is used to wrap the rice balls, is rich in iodine, fiber, and antioxidants. Additionally, the vinegar used to season the rice has probiotic properties that can promote gut health. By making onigiri at home, you can control the amount of added sugar and salt, ensuring a healthier snack option.
Pairing Sushi Rice Balls with Other Dishes
Onigiri make a versatile side dish that pairs well with a variety of other Japanese foods. Consider serving them alongside miso soup for a comforting meal, or with a fresh seaweed salad for a light and refreshing combination. They also complement other sushi dishes, such as classic California Sushi Rolls or the more adventurous Volcano Rolls. Onigiri even make a great pairing with skewers of grilled chicken yakitori or a serving of vegetable tempura for a well-rounded meal.
Easy Sushi Rice Balls Recipe for Special Occasions
Onigiri are a wonderful addition to any special occasion or celebration. They add a touch of authenticity and charm to your menu, making them an excellent choice for birthday parties, picnics, or family gatherings. For a visually appealing display, arrange the rice balls on a large platter with various toppings and garnishes, allowing guests to sample different flavors and combinations. This interactive dining experience is sure to be a hit and leave a lasting impression on your guests.
Sustainable Onigiri Practices
One of the beauties of making onigiri at home is the ability to practice sustainability. By using homemade or locally sourced ingredients, you can reduce waste and support eco-friendly practices. Additionally, onigiri provide an excellent way to use up leftovers, minimizing food waste. Store the rice balls in reusable containers or wraps, and consider composting any vegetable scraps or waste from the preparation process. Small efforts like these contribute to a more sustainable kitchen and lifestyle.
Cleanup Tips and Tricks
Like any cooking project, making onigiri can leave you with a bit of cleanup. To make this process easier, keep the following tips in mind:
- Start with a clean workspace and organize your ingredients and tools before you begin.
- Rinse utensils like sushi knives and cutting boards, immediately after use to prevent sticky rice from hardening.
- Use a damp sponge or cloth to wipe up any rice grains or spills promptly.
- For deep cleaning after cooking, consider using a specialized cookware cleaner and applying cutting board oil to maintain the quality and longevity of your tools.
For more in-depth cleaning tips, check out this external guide on cleaning cast iron.
Visit this site for more tips on cleaning cookware.
Conclusion
With this easy sushi rice balls recipe, you’re more than ready to embark on a culinary journey thats as fun as it is delicious. These versatile, portable, and customizable rice balls are perfect for any occasion, be it a quick snack, an elegant addition to a sushi platter, or a delightful offering at your next gathering. By following the detailed instructions and tips provided in this article, you’ll be able to create authentic, mouth-watering onigiri that will impress family, friends, and even yourself! So grab your ingredients, roll up your sleeves, and get started on making your very own sushi rice balls today. Dont forget to check out other delightful recipes like Hawaiian Roll, Deep Fried Sushi Roll, andLobster Roll to further expand your sushi-loving horizons.
As an Amazon Associate, I earn from qualifying purchases.


