 by
by Introduction
If you are a rice lover then you must wants to know how to prepare sushi rice. Who doesn’t like Japanese restaurants where you can order yourself a portion of your favorite meal: rolls (maki, uramaki, or tamaki), nigiri, or sashimi? No wonder people try to cook the same at home very often. But to succeed it is very important to follow all the technologies of the cooking process.
The most considerate part should be rice. There can be a number of ways to prepare it at home, depending on the time you mean to spend on it and on the utensils you possess in your kitchen. Some chefs say it’s crucial to buy this special kind of rice which we can find in the Asian sections of supermarkets. Whereas others don’t mind simply buying a casual short- or medium-grain japonica pack.
In this article we will have a closer look at the three most accessible options for everyone, cooking rice in a microwave, in a traditional pot on a cooker, and a crockpot.
What Is Sushi Rice?
The Japanese usually use special rice for their traditional food, koshihikari or shushiki. However, it can be not very easy to find the proper type in supermarkets outside of this country, even though Japanese cuisine has become considerably popular in recent decades.
For those who prefer cooking at home and search for the best Western analog for their sushi, there is japonica rice. Its grains can be middle or short, and the most important feature of it is that it is sticky enough to make rolls and crumbly enough to imitate its delicious original.
Various Ways How To Prepare Sushi Rice
1. The most conventional way to cook rice for sushi is without using any appliances like a microwave or a crockpot. You will only need water, rice, and a pot for this. Start with washing rice carefully multiple times until the water gets transparent. And try to be as soft as you can, be subtle when turning it, and avoid over-pressing the rice, so its grains remain whole.
After that fill the rice with water and leave for 20-30 min. Then drain again and add cold still water in proportion 1:1. Cover the pot with a lid and put it on a cooker and leave until it starts boiling, then lower the heat almost to the minimum and cook for about 15 min more.
It is important to keep the lid close all the time, so the rice doesn’t get dry. It’s better to use utensils with thick sides. When the crop is ready, don’t open the lid and cover the whole pot with a thick towel. Leave so for another 15 minutes.
While waiting for it to get ready, you may prepare a dressing for your rice. Mix vinegar, salt, and sugar, and stir them until both sugar and salt melt completely, and the mixture gets transparent. Pour it on the warm rice and stir carefully (moving from the borders to the center of the pot). It’s better to use soft silicon or a wooden spatula.
2. The next recipe may sound strange for cooks who’s never considered a microwave a respectful apprentice in the kitchen. However, there is a whale of recipes for this exceptionally useful appliance. While it is doing your job you may focus on other tasks.
For this, we will need two ingredients only! Water and rice in proportion 1:1. It’s better to use short- or medium-grain rice due to its stickiness and crumbliness at the same time.
Wash the rice thoroughly a number of times until the water is transparent. Then drain the water and pour the rice into a glass bowl. Fill it with still cold water and put the bowl into a microwave for 15 min with a power of 800 watts approximately. When finished, take the bowl out and stir the rice carefully. Cover it with a glass lid and put it back into the microwave for another 15 min on the same power.
Your rice is ready to be served as a separate dish if you season it with rice vinegar or you can prepare it yourself (as they do in the restaurants). Otherwise, you can use your rice further for your delicious sushi!
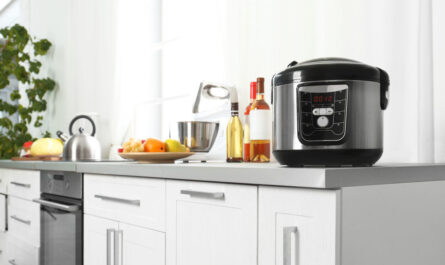
3. Crockpots are getting more and more usual in our kitchen and there’s no excuse not to try it out for sushi rice as well. Cooking in it is surprisingly easy, and the result is praiseworthy. The rice is simultaneously crumbly and sticky enough for further cooking. Additionally, it is incredibly tasty. You can use it for nigiri, rolls, multiple Japanese snacks, and more.
To prepare rice in a crockpot you will need:
- two cups of the rice for sushi (or normal short- or medium-grain);
- 2,5 cups of cold still water.
Ingredients for the rice dressing:
- 35 ml of rice vinegar (which you may replace though by the apple or by the white wine vinegar);
- ¾ of a teaspoon of fine salt;
- 2 spoons of sugar.
What is important in the beginning is to wash the rice thoroughly multiple times. It may take 3 or 4 times, but you should do it until the water gets transparent. Pour the water away and put the rice into a crockpot cup. Add 2,5 cups of still cold water to it. Put the cup into the machine and run the program which doesn’t require time but will cook until all the water evaporates. If there’s not the case, you may choose Crops or Rice programs, but be attentive and watch the water carefully. As soon as it is all gone, switch the crockpot immediately. Leave the rice closed under the lid for some 15-20 min and you may start cooking the dressing for it.
Let the rice get cold and keep using it as a crucial ingredient for your best homemade snacks and sushi!
In conclusion. Independently on what you’re going to use in your kitchen to prepare rice for your Japanese meals, remember that it should be treated carefully and thoroughly at the same time. Wash it delicately but earnestly, until the water is not opaque anymore. Cook it in whatever you want, but mix it with subtlety, try not to crack any grain. Use utensils made of a material that is to help you in this fragile job: glass bowls and lids, silicon or wooden spatulas and spoons. And don’t forget about the filling!